
the_plan <-
  drake_plan(
    lexington_bbx = list(min_lon = -84.7533,
                         max_lon = -84.2143,
                         min_lat = 37.9358,
                         max_lat = 38.1775),

    lexington_map = get_map(lexington_bbx),
    lexington_counties = get_counties(lexington_bbx, "KY"),
    lexington_water = get_us_water(lexington_bbx,
                                   lexington_counties,
                                   "KY"),
    lexington_counties_water = combine_counties_uswater(lexington_counties, lexington_water),
    sarah_locations = get_takeout_locations("saraheflight/saraheflight_takeout"),
    sarah_routes = get_sarah_routes(sarah_locations)
)Inspiration
Way back in October 2020, I saw a tweet cross my feed by Esteban on making personal map art, and I was struck by their map (Moro 2020). I was also looking for an idea for my spouses birthday that was coming up in November, and I decided to do one of these maps for my lovely wife.
If you want to create one of these, you should definitely check out Esteban’s post (Moro 2020) for how they did it. Esteban also has figures for how things look as they go together. I’m not that organized, unfortunately.
I’m detailing my process here, because I tried to organize it in a bit of a different way, putting as much stuff into functions as I could so I can reuse code where possible.
You can check out the code on GitHub (Flight 2020) and see how it’s organized.
A short list of what you need for this project:
- A region of interest with mapped roads in OpenStreetMap
- A list of starting locations and ending locations that the shortest route is easily findable.
- Esteban and I used Google Maps takeout data.
- My spouse and I have location data from when we started using Google phones back in August of 2016.
Decide on a Size
Ideally before embarking on this project, decide what size of a print you want. If you are in the USA, WalMart’s prices are actually pretty decent, and I’ve found their quality to be good. I was very happy with the canvas I got from them back in November. The size of the print defines the ratio of the bounding box you are going to want to use and how you want it to look. I ultimately decided on a 16 in high by 20 in wide.
Find Your Bounding Box
This is the part that takes some interactive work unless you just want to work within a particular city limits.
I used the export function on OpenStreetMap to create my bounding box of the area I was interested in.
I used {drake} to define a workflow for this project so any fetching of data from OpenStreetMap would only have to be done once.
This plan has the bounding box defined, fetches the map data, counties data, and any water data, merges it together, and then grabs the locations, and determines the routes.
Fetching Map
We fetch the map data for the bounding box. Note that we fetch a ton of the road data, because that is what is likely to make it look nice. We also classify the highways and streets so that they can have a different weight in the final map.
get_map = function(bbx_list){
  bbx = rbind(x=c(bbx_list$min_lon, bbx_list$max_lon),y=c(bbx_list$min_lat, bbx_list$max_lat))
  colnames(bbx) = c("min","max")

  highways = bbx %>%
    opq() %>%
    add_osm_feature(key = "highway",
                    value=c("motorway", "trunk",
                            "primary","secondary",
                            "tertiary","motorway_link",
                            "trunk_link","primary_link",
                            "secondary_link",
                            "tertiary_link")) %>%
    osmdata_sf()
  streets = bbx %>%
    opq() %>%
    add_osm_feature(key = "highway",
                    value = c("residential", "living_street",
                              "service","unclassified",
                              "pedestrian", "footway",
                              "track","path")) %>%
    osmdata_sf()

  list(highways = highways,
       streets = streets)
}
Adding County / State Features & Water
We also want to have the data for the county and waterways (there are probably lakes and rivers or coastlines near you).
get_counties = function(bbx_list, state = "KY"){

  counties_state = counties(state=state, cb=T, class="sf")
  counties_state = st_crop(counties_state,
                         xmin = bbx_list$min_lon, xmax = bbx_list$max_lon,
                         ymin = bbx_list$min_lat, ymax = bbx_list$max_lat)
  counties_state
}

get_us_water = function(bbx_list, counties_list, state){
  get_water = function(county_GEOID, state = state){
    area_water(state, county_GEOID, class = "sf")
  }
  water = do.call(rbind,
                   lapply(counties_list$COUNTYFP, get_water, state))
  water = st_crop(water,
                   xmin = bbx_list$min_lon, xmax = bbx_list$max_lon,
                   ymin = bbx_list$min_lat, ymax = bbx_list$max_lat)
  water
}

combine_counties_uswater = function(counties_state, counties_water){
  st_difference(counties_state, st_union(counties_water))
}
This gives us a decent image with the highways, streets, county level features, and the waterways.
Location Data
As I said previously, I used the Google Maps location data from Google Takeout. I asked my spouse for the data. Be advised, it can take Google a little bit to prepare this data depending on how much there is.
If you didn’t have an automated source of data, you could probably set up a set of destinations replicated by how often you think you traveled there to get relative weights.
For this, we will parse through the takeout data and get all of the destinations.
The function below goes through all of the files (they are organized by year and month) and grabs the locations, and puts them into a data.frame to iterate through.
get_takeout_locations = function(takeout_dir){

  file2 = file.path(takeout_dir, "Takeout", "Location History", "Semantic Location History")
  files = list.files(file2, pattern = "*.json", recursive = TRUE, full.names = TRUE)
  get_locations = function(file, .progress = NULL){
    knitrProgressBar::update_progress(.progress)
    data = jsonlite::fromJSON(file)
    tl_obj = data$timelineObjects$placeVisit
    loc = cbind(tl_obj$location, tl_obj$duration)
    tt = as.numeric(loc$startTimestampMs)/1000
    loc$time=as.POSIXct(tt,origin = "1970-01-01")
    #conver longitude & latitude from E7 to GPS
    loc$lat = loc$latitudeE7 / 1e7
    loc$lon = loc$longitudeE7 / 1e7
    loc = data.frame(loc)
    loc = loc[, c("placeId", "time", "lat", "lon")]
    loc = dplyr::filter(loc, !is.na(lon))
    loc
  }
  locs_df = purrr::map_df(files, get_locations)
  locs_df
}
Routes
Then we have to work out the routes. For this project, it was complicated by the fact that we’ve lived in two different locations since we moved here. So this function sets two different home locations, and switches between them depending on the date of the trip.
We also assume that every trip is a trip between home and the destination. The locations are organized by day, so we have to do some transformations to make every trip start at home and end at the destination. Obviously that’s not how we actually travel, but otherwise I’d have to try and extract the route level data from the takeout, and that would be more of a pain. And for the kind of map we are trying to generate, this works well enough.
get_sarah_routes = function(locs_df){
  old_home = list(lat = 37.9898308, lon = -84.5054868)
  new_home = list(lat = 37.982469, lon = -84.506552)
  locs_df$day = lubridate::floor_date(locs_df$time, unit = "day")
  locs_df = tibble::as_tibble(locs_df)
  locs_df = dplyr::mutate(locs_df, home = dplyr::case_when(
    day <= as.POSIXct("2018-03-14") ~ list(old_home),
    TRUE ~ list(new_home)
  ))

  split_day = split(locs_df, locs_df$day)

  day_routes = purrr::map(split_day, daily_routes)
  day_routes = do.call(rbind, day_routes)
}

daily_routes = function(day_locations){
  home_loc = day_locations$home[[1]]
  use_locs = day_locations[, c("lat", "lon")]
  use_locs2 = rbind(data.frame(lat = home_loc$lat, lon = home_loc$lon),
                    use_locs,
                    data.frame(lat = home_loc$lat, lon = home_loc$lon))
  route = NULL
  for(irow in 2:nrow(use_locs2)){
    p1 = c(use_locs2$lon[irow - 1], use_locs2$lat[irow - 1])
    p2 = c(use_locs2$lon[irow], use_locs2$lat[irow])
    oo = osrmRoute(src = p1, dst = p2, returnclass = "sf",
                    overview = "full")
    route <- rbind(route, oo)
  }
  route
}
Plot It!
Finally, we put everything together into an image that can be plotted!
This ended up in a script because I was doing a lot of playing around with it, and when I finally got the image, I just saved the final script. You can also see here that after the fact I was trying to mess with the bounding box to get the correct aspect ratio. Don’t be like me, do it up front and figure it out.
source("packages.R")
loadd(lexington_bbx)
loadd(lexington_map)
names(lexington_map)
loadd(lexington_counties_water)
loadd(sarah_routes)
lexington_bbx = list(min_lon = -84.7533,
max_lon = -84.355,
min_lat = 37.9358,
max_lat = 38.1775)
(lexington_bbx$max_lat - lexington_bbx$min_lat) / (lexington_bbx$max_lon - lexington_bbx$min_lon)
color_roads <- rgb(0.42,0.449,0.488)
final_map = ggplot() +
geom_sf(data = lexington_counties_water,
inherit.aes = FALSE,
lwd= 0.0, fill = rgb(0.203,0.234,0.277)) +
geom_sf(data = lexington_map$streets$osm_lines,
inherit.aes = FALSE,
color=color_roads,
size = .4,
alpha = .65) +
geom_sf(data = lexington_map$highways$osm_lines,
inherit.aes = FALSE,
color=color_roads,
size = .6,
alpha = .65) +
geom_sf(data = st_geometry(sarah_routes),
inherit.aes = FALSE, col = "orange", alpha = 0.2) +
coord_sf(xlim = c(lexington_bbx$min_lon, lexington_bbx$max_lon),
ylim = c(lexington_bbx$min_lat, lexington_bbx$max_lat),
expand = FALSE) +
theme(legend.position = "none") + theme_void() +
theme(panel.background=
element_rect(fill = "white"))
ggsave(final_map,
filename = "sarah_lexington.png",
scale = 1,
width = 20,
height = 16,
units = "in",
bg = rgb(0.203,0.234,0.277),
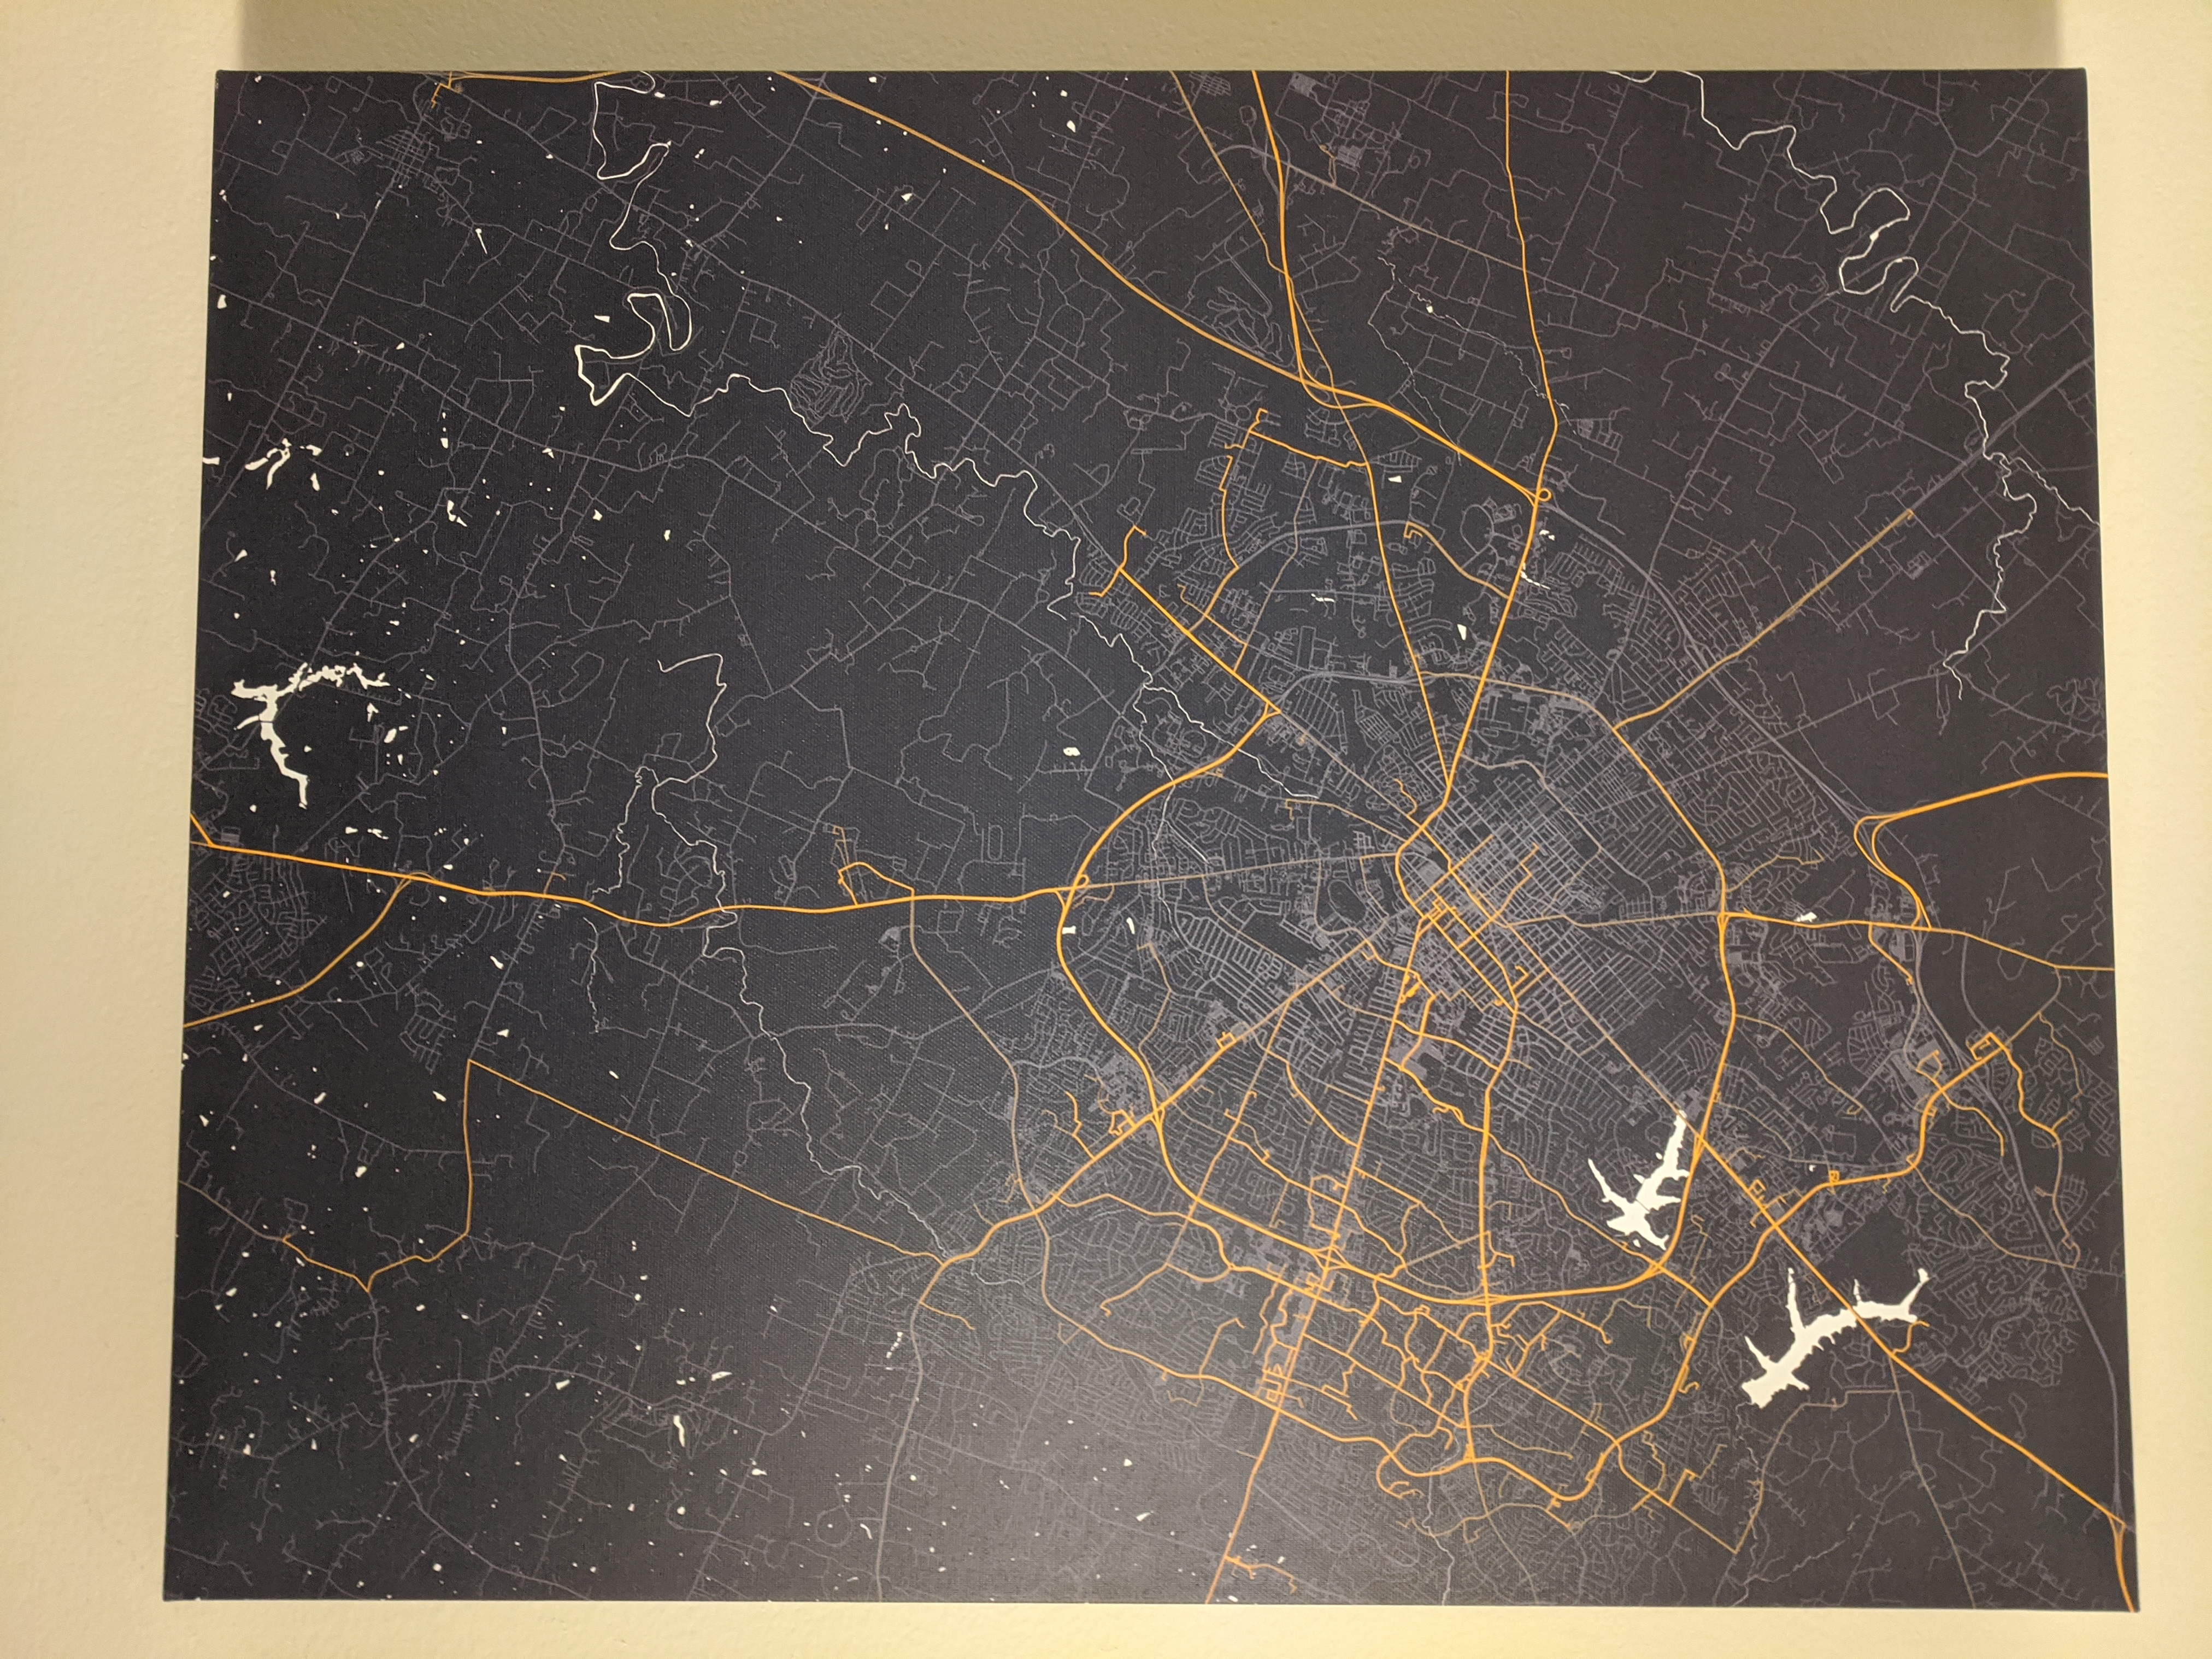
dpi = 500)And what I got was this:

And now it hangs on our wall as a canvas print:
References
Flight, Robert M. 2020. “Mapart.” https://github.com/rmflight/mapart.
Moro, Esteban. 2020. “Personal Art Map with r.” http://estebanmoro.org/post/2020-10-19-personal-art-map-with-r/.
Reuse
Citation
BibTeX citation:
@online{mflight2021,
  author = {Robert M Flight},
  title = {Creating a {Map} of {Routes} {Weighted} by {Travel}},
  date = {2021-03-21},
  url = {https://rmflight.github.io/posts/2021-03-21-creating-a-map-of-routes-weighted-by-travel},
  langid = {en}
}
For attribution, please cite this work as:
Robert M Flight. 2021. “Creating a Map of Routes Weighted by
Travel.” March 21, 2021. https://rmflight.github.io/posts/2021-03-21-creating-a-map-of-routes-weighted-by-travel.